Introduction
Alright, let's talk about making top-notch electronics today. In the world of achieving high-quality SMT assembly, everyone's trying to move fast, handle complex designs, and still make stuff that lasts. It doesn't matter if you're building the latest smartphone or a sophisticated industrial control unit—there's one simple truth: if you think the key to high-quality SMT assembly, you've gotta pay attention to the PCB stencil.
Think about it: these stencils aren't just random pieces of metal. They're like high-precision tools that decide exactly where the solder deposition in the SMT assembly process. They're involved from the very beginning, when you're just prototyping a PCB, all the way to cranking out thousands of units on the assembly line.As electronics miniaturize and PCB layouts become more complex, the choice of stencil becomes ever more critical.
So, what's this guide all about? We're going to break down how importance of PCB stencils. We'll give you the full lowdown on why they're the PCB stencils are key to high-quality SMT assembly. We're talking everything—from how stencil fabrication are made to picking the perfect one for your job. Laser cutting, getting the alignment just right, how long they last, and even the latest tech trends in stencil manufacturing—it's all in here. Think of this as your one-stop shop for all things circuit board stencils.
What is a PCB Stencil? Overview of PCB Stencils
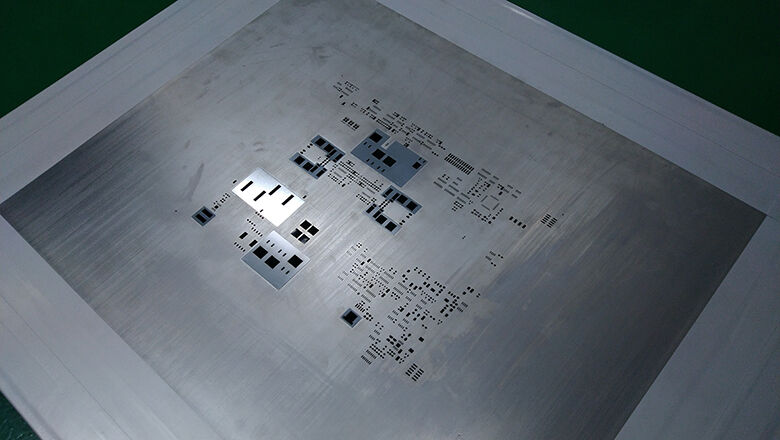
So, what exactly is a PCB stencil? You might hear it called an SMT stencil or just a circuit board stencil. Basically, it's a thin metal sheet with a bunch of laser-cut holes, or "apertures," that line up perfectly with the pads on your circuit board.
During the printing process: you need to be care for aligned with the PCB, spread some solder paste on top, and when you lift the stencil away, the paste is left only on the spots where you'll place your components. It's like using a stencil for painting, but for super-precise electronics.
Overview of PCB Stencils and Their Applications
- Stencil required:If you're doing any kind of professional SMT assembly, you absolutely need a good stencil. It's the only way to get the solder paste exactly where you want it.
- Process for PCB: This is the very first, and super critical, step in the assembly line.
- Stencil applications:You'll find these stencils being used in everything from your smartphone and your car's electronics to advanced stuff in planes and medical gear.
- Importance of PCB:Without a stencil to control where the paste goes, you'd get a huge mess. Components wouldn't sit right, soldering would be unreliable, and your final product would be much more likely to fail.
Materials Used for PCB Stencil
- Stainless Steel: This is the go-to material. It's strong, precise, and lasts a long time.
- Nickel: For those really tiny, densely-packed components, nickel is often the choice because it can create super-smooth holes.
- Polymer: Sometimes used for quick, cheap prototypes, but not for the long haul.
- Stainless Steel: The actual stencil sheet is held tight by a frame, and aluminum is often used for that because it's nice and light.
Construction of a PCB Stencil
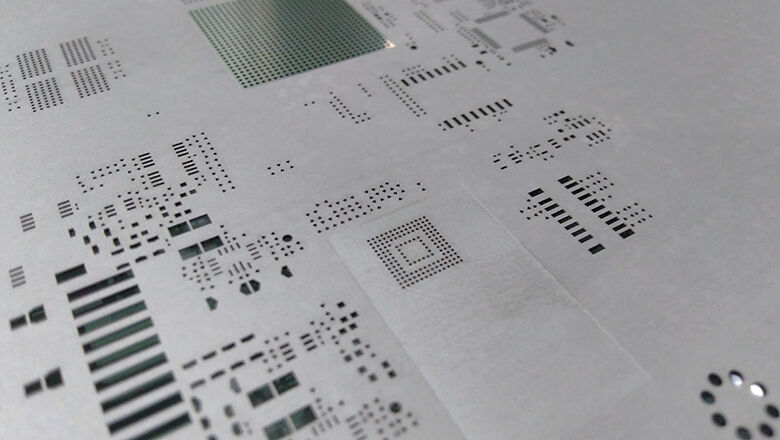
- Apertures in the stencil: The size and shape of these holes are directly taken from your PCB design, and they control how much paste gets dumped onto each pad.
- Stencil thickness:This isn't one-size-fits-all. If you have a lot of tiny components, you'll want a thinner stencils. For big power-hungry chips that need more solder, you'd go with a thicker one.
- Framework of a PCB stencil: The frame is what keeps the stencil stretched tight and flat, which is essential for getting a clean print every time, especially in high-volume manufacturing.
Why PCB Stencils Are Essential in SMT Assembly
So, why PCB stencils are critical ? Think of them as the key to making sure every single solder joint on your board is solid and consistent, every single time. The quality of your SMT stencil applications directly affects your success rate—fewer defects and a more reliable assembly process.
The Key to High-Quality SMT Assembly
Why are PCB stencils key?
- Ensures solder paste to the PCB goes only on the intended pads.
- They eliminate the mess and inconsistency of trying to apply paste by hand, which is impossible on complex, dense boards.
- They're essential for those tiny, fine-pitch components, where even a tiny bit of extra paste can cause shorts or a bad connection.
Stencils and SMT Assembly Process
- Pads on the PCB: The stencil delivers the perfect amount of paste to every type of pad, from the smallest micro-BGA to large power connectors.
- Alignment: A well-made stencil makes it easy to line up perfectly with the board, which is absolutely critical for a good print.
- Printing process: This is where the stencil proves its worth. A good print drastically reduces common problems like tombstoning, solder bridges, or not enough solder.
- Durability of the stencil: Stencils have to be tough. They're used over and over, so they need to be made from durable, corrosion-resistant materials to maintain their precision.
The Three Primary Types of PCB Stencils
1. Framed Stencils (Mesh-Mounted SMT Stencil)
- Definition: This is your classic, heavy-duty stencil. It's a metal sheet permanently stretched and glued onto a solid metal frame.
- Where Used: This is the go-to for big production runs in automated assembly lines.
- Benefits: The frame keeps it super tight and flat, making it super reliable for printing thousands of boards in a row.
- Drawbacks:They're bulky, more expensive (so not great for a one-off prototype), and they take up a lot of storage space.
2. Frameless Stencils
- Definition: It's basically just the metal sheet by itself, no frame attached. People often call these "prototype stencils."
- Where Used: Perfect for when you're just testing a design, doing small batches, or you need to switch between different stencils quickly.
- Benefits: They're lightweight, cheap, and can be made really fast.
- Drawbacks: They can be a bit floppy, making them trickier to line up perfectly by hand. They also don't hold up as well for long, high-volume runs.
3. Step Stencils (Variable Thickness)
- Definition: A clever stencil that isn't the same thickness everywhere. It has sections that are thicker or thinner, like steps.
- Where Used: This is your savior when your board has a mix of tiny chips and big, power-hungry components that need more solder.
- Drawbacks: The thin "step-down" areas are great for fine-pitch parts, while the thick "step-up" areas dump extra paste for large connectors. This helps prevent defects on both ends of the scale.
- Drawbacks: They're more expensive and complicated to make, but for a complex board, they're absolutely worth it.
Comparison of the Three Primary Types of PCB Stencils
Type |
SMT Stencil Applications |
Advantages |
Drawbacks |
Framed |
High-volume, automated SMT assembly |
Durable, repeatable |
Price, storage |
Frameless |
Prototyping, quick-turn jobs |
Cost, flexibility |
Stability, wear |
Step Stencil |
Mixed tech, varied pad sizes |
Precise, prevents defects |
Cost, complexity |
Key Elements of High-Quality PCB Stencil Design
High-quality stencils start with careful, informed design. Stencils directly impact yield and are essential in achieving high-quality SMT assembly.
Stencil Thickness and Optimization
- Adjusting the stencil thickness: It's not one-size-fits-all.
- Size optimization of a PCB stencil:The physical size of the stencil itself should be optimized for your printer and to make it easy for operators to handle.
- Design based on the PCB layout: The stencil's design is taken directly from your PCB layout. The holes have to match the pads on your board exactly.
Aperture Design and Stencil Surface Considerations
- Apertures in the stencil: Getting the size and shape of these holes right is crucial. Do it well, and you prevent common issues like solder bridging or components standing up (tombstoning). The goal is a clean, consistent paste release every time.
- Stencil surface: The surface of the stencil is often polished. A smooth, polished surface helps the solder paste flow off cleanly and prevents it from sticking where it shouldn't.
- Imperfections on the stencil material: Any scratch, dent, or imperfection on the stencil can mess up the print. That flaw will get copied onto the solder paste and then onto your board, potentially causing defects.
Framework & Materials
- PCB stencil framework:For automated production lines, you need a robust frame—almost always made from stainless steel—to keep the stencil perfectly tense and flat for thousands of prints.
- Materials used for PCB stencil: What your stencil is made of (both the frame and the foil itself) depends on your needs: How many boards are you making? How will you clean it? Is it for automated or manual use? You pick the material that fits your process.
PCB Stencil Manufacturing and Fabrication
Stencil Fabrication Methods
- Laser-cut stencil: This is the go-to method for most jobs today. It’s super precise, with clean, smooth walls—great for accurate paste release.
- Electroformed stencils: These are made by building up layers of nickel. They’re your best bet for ultra-fine-pitch components where extreme precision is needed.
- Chemical etching: An older, cheaper method, but it doesn’t deliver the same accuracy as laser or electroforming. You don’t see it as much these days.
SMT Stencil Manufacturing Best Practices
- Stencil manufacturing process: Stencils are created using computer-guided machines (for laser cutting) or electroforming setups. They follow your PCB design files directly, so everything matches perfectly.
- Polishing/Finishing: After cutting, stencils often get a special treatment—like electropolishing or a nano-coating. This makes the surface extra smooth, helps the paste release cleanly, and boosts consistency print after print.
Stencil Manufacturing: Top Tips
- Always use a professional partner :Don’t cut corners here. A good supplier knows how to make a stencil that’s durable, perfectly matches your board, and has the right finish. It makes all the difference.
- Request a sample laser-cut stencil : When trying out a new stencil vendor, request a sample laser-cut stencil. Inspect the holes and surface finish up close—that’s where you’ll spot quality differences.
- Specify finishing options: For high-volume runs or boards with tiny components, always specify a finish like electropolishing or a nano-coating. A smoother surface means better paste release and far fewer printing issues.
The PCB Stencil Printing Process in SMT Assembly
Think of the stencil printing process as the make-or-break moment in SMT assembly. Getting PCB stencil right means you're setting yourself up for a perfect soldering job later. It all comes down to using a great stencil to put the perfect amount of solder paste exactly where you need it.
Step-by-Step SMT Stencil Printing Process
Stencil and PCB Preparation
1.First, you do a quick check of the stencil. You're looking for any dings, scratches, or dried-up solder paste from the last run.
2.Then, you make sure both the stencil and the circuit board are squeaky clean—no dust or gunk allowed.
Stencil Alignment
1.This is where you carefully position the stencil over the PCB. Machines use special camera systems to line up with little markers on the board (called fiducials) for a perfect match.2
2.Getting this alignment spot-on is absolutely crucial. The holes in the stencil have to land perfectly on the pads of the board.
Printing Solder Paste
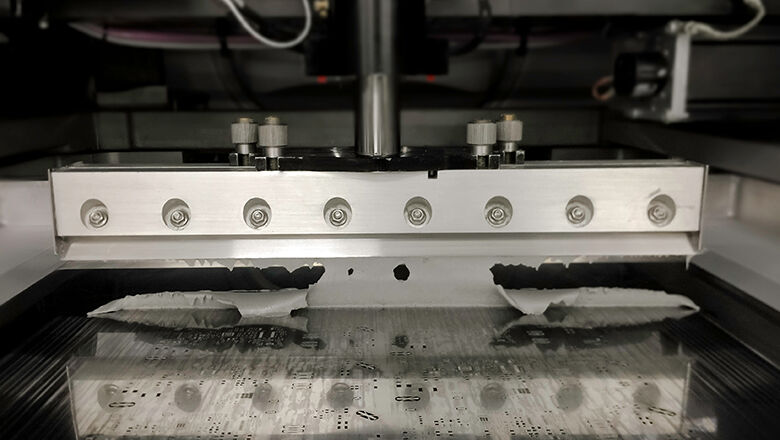
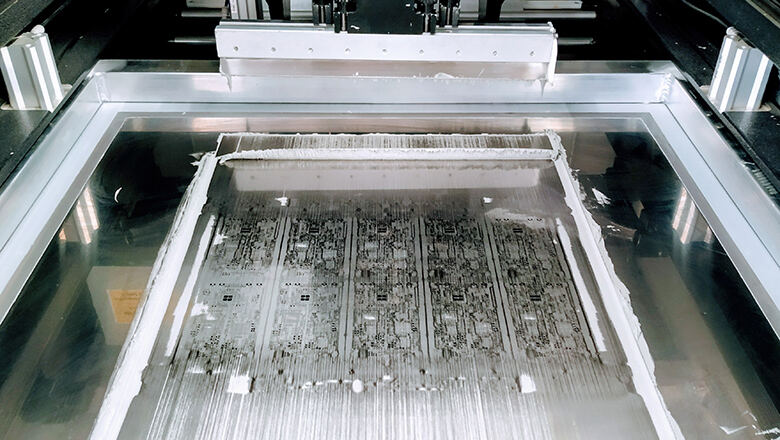
1.Now, you spread solder paste over the stencil using a metal squeegee blade.
2.The trick is in the pressure, speed, and angle you use. You want to push the paste so it fills every single hole evenly, without leaving a big mess on the stencil surface.
Stencil Separation
1.Next, you lift the stencil straight up. You do this smoothly and carefully to get a clean "pull-away." If you jerk it, you'll smear the paste or leave some holes empty.
Inspection and Repeat
1.After printing, you don't just move on. You check the paste deposits with a special machine (called SPI) to make sure the volume and placement are perfect.
2.And remember to clean the stencil regularly—using something like IPA or an automated cleaner—to wipe off old paste and flux. This keeps your prints consistent, run after run.
Troubleshooting & Tips for High-Quality SMT Stencil Printing
- If bridges or extra paste are seen, check for excess pressure or oversized apertures.
- If paste is missing or pads are incomplete, the stencil may be clogged or out of alignment.
- For advanced cleaning, consider ultrasonic bath systems to prevent imperfections on the stencil material over time.
Optimizing Your SMT Assembly with PCB Stencils
So, optimization is really just a fancy word for constantly making things better. It's about using data from your process to tweak and improve how you use your stencil, from the first design all the way to full-scale production.
Factors in Choosing the Right PCB Stencil
- Specific PCB layout: Every board is different. A new version might need different hole sizes or a change in stencil thickness.
- Assembly process and production volume: Are you building thousands of boards on an automated line? Then a sturdy, framed stencil is your friend. Just doing a few quick prototypes? A simple, frameless stencil is probably faster and cheaper.
- Complexity of the PCB: If your board is packed with tiny components, you'll need a thinner stencil with super precise holes to avoid a mess.
- Pads on the PCB: Got big, chunky pads for power components? You might need a "step stencil" that's locally thicker in those spots to lay down more solder paste.
Process Optimization
- Document the printing process: Keep a log of your printer settings—squeegee pressure, speed, how often you clean the stencil. When you see defects, use that data to know what to change.
- Work with your stencil partner:They're the experts! A good partner can look at your results and suggest real improvements, like switching to a different stencil type or adjusting the thickness.
- Size optimization of a PCB stencil: Make sure the physical stencil size is a good match for your printer. If it's too big or too small, it can be awkward to handle and hurt your print quality.
Common Challenges and Solutions in SMT Stencil Applications

Even high-quality stencils can encounter issues in demanding environments. Understanding challenges and proactive solutions ensures high-quality SMT assembly results.
Even the best stencils can run into problems on a busy production line. Knowing what to look for and how to fix it is key to keeping your high-quality SMT assembly results.
Typical Issues
- Misalignment: After a lot of use, or if it's stored wrong, a stencil can warp or shift just enough that it doesn't line up perfectly with the board anymore.
- Clogged apertures: Solder paste can dry up and get stuck in the tiny holes, especially the really small ones for fine-pitch parts. This blocks the paste from transferring to the board.
- Stencil wear: Over time, stencils can get scratched, dented, or even start to corrode. Any of these will mess with your print quality.
- Environmental factors: Believe it or not, big swings in humidity can actually change the tension in the stencil, leading to sneaky printing defects.
Solutions
- Stencil alignment: Make sure your printers are regularly re-calibrated. Using stencils and boards with plenty of fiducial marks gives the vision system more chances to get a perfect lock.
- Cleaning frequency: For high-volume lines, an automated cleaner is a lifesaver. Always use the recommended cleaning solvents, as the wrong kind can damage the stencil's surface.
- Storage: Don't just toss your stencils in a corner. Store them upright in a dedicated cabinet that's clean and has stable humidity. This prevents warping and keeps them in like-new condition.
Best Practices for Achieving High-Quality SMT Assembly Results
The best way to get great, consistent results with high-quality SMT assembly is to stick to proven methods across your entire process.
Top Best Practices
- Design every stencil based on the PCB layout. Don’t reuse generic designs across boards.
- Inspect stencils before and after each job for wear or residue.
- Log and track every stencil’s use cycles. Replace before surface degradation impacts quality.
- Train staff to identify signs of stencil wear, misalignment, or improper cleaning.
- Invest in high-quality materials and coatings—these pay dividends with fewer defects and less downtime.
Frequently Asked Questions on Choosing the Right SMT Stencil
Q: What’s the best material for a circuit board stencil?
A: For most jobs,stainless steel is your best bet—it's tough and gives reliable results. But if you're working with super tiny, complex components, go with nickel or electroformed stencils for that extra precision.
Q: Do all PCBs require a solder paste stencil?
A: If you're doing any kind of professional production, absolutely. You might get away without one for a quick hand-built prototype, but for consistent, high-quality assembly, a stencil is a must.
Q: How does stencil foil thickness affect performance?
A: Really important. Thinner stencils are great for dense boards with fine-pitch parts—they put down just enough paste. Thicker stencils help when you need extra solder for big power components or large connectors.
Q: What are the main steps in stencil manufacturing?
A: It starts with your board's design file. They use that to create the stencil pattern, pick the material, and then laser-cut or electroform the holes. After that, it gets a smooth polish or special coating, followed by a final quality check and clean.
Q: How do I minimize defects with stencils?
A: Definitely. Keep your stencil clean and check it for scratches regularly. Always make sure it's aligned perfectly to the board, and use what you learn from past builds to tweak the aperture designs—it makes a huge difference.
Conclusion: Stencils Are Key to High-Quality SMT Assembly
So, let's be real: in today's electronics manufacturing, stencils are key to high-quality SMT assembly without a great stencil. It's that simple.
Every part of the process—from how the stencil fabrication is made to how it's used on the line—depends on it. Putting in the effort upfront to choose the right SMT stencil one (getting the material, and framework design to aperture definition) pays off massively. It’s what leads to reliable, defect-free boards that can keep up with how fast technology changes.
Bottom line: don’t think of stencils as just another tool. Think of them as critical infrastructure. They're the foundation your circuit board assembly process is built on.
And as tech keeps moving forward, staying updated on the latest in stencil design and stencil manufacturing isn’t just a nice-to-have—it’s how you’ll keep your products and your business ahead of the curve.